
下载测试
# 说明:下载内容不保存在本地磁盘,而是直接丢弃

Online 法国 - 1000MB
wget -O /dev/null http://ping.online.net/1000Mo.dat

Online 荷兰 - 1000MB
wget -O /dev/null http://ping-ams1.online.net/1000Mo.dat
Speedtest
- 方式一:Speedtest 官方
## Ubuntu/Debian

curl -s https://packagecloud.io/install/repositories/ookla/speedtest-cli/script.deb.sh | sudo bash

sudo apt-get install speedtest

speedtest- 方式二:Speedtest-cli
GitHub项目地址:https://github.com/sivel/speedtest-cli
wget -O speedtest-cli https://raw.githubusercontent.com/sivel/speedtest-cli/master/speedtest.py

chmod +x speedtest-cli

./speedtest-cli
## 或者
python3 ./speedtest-cli --share
测试详情:
## 如果出现以下错误:
/usr/bin/env: ‘python’: No such file or directory
## 输入以下命令安装:
apt-get install python
## 测试结果:
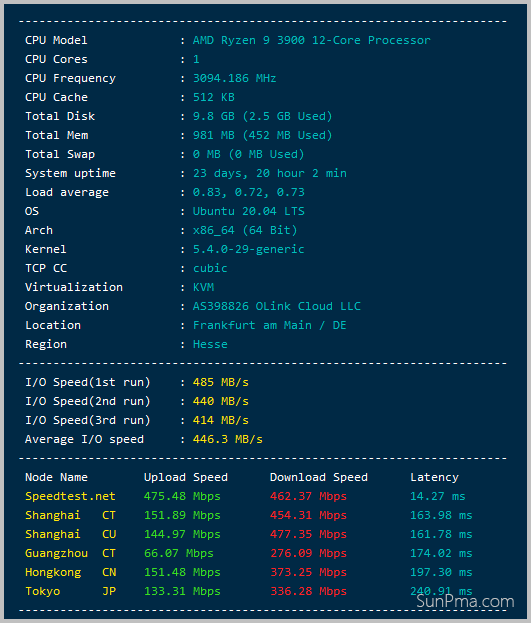
root@SunPma ~ # ./speedtest-cli --share
Retrieving speedtest.net configuration...
Testing from Microsoft Corporation (20.187.72.158)...
Retrieving speedtest.net server list...
Retrieving information for the selected server...
Hosted by Misaka Network, Inc. (Hong Kong) [4.85 km]: 2.74 ms
Testing download speed.............................................
Download: 3514.72 Mbit/s
Testing upload speed...............................................
Upload: 964.31 Mbit/s
Share results: http://www.speedtest.net/result/12678652753.png| 参数 | 说明 |
|---|---|
| -h--help | 显示此帮助消息并退出 |
| --no-download | 不执行下载测试 |
| --no-upload | 不执行上传测试 |
| --single | 使用单个连接,而不使用多个连接 |
| --bytes | 以字节而不是位为单位显示值 |
| --share | 生成并提供speedtest.net共享的URL结果图像 |
| --simple | 不显示详细输出,仅显示基本信息 |
| --csv-header | 打印CSV标题 |
| --list | 按距离排序显示speedtest.net的服务器列表 |
| --server SERVER | 指定要测试的服务器ID |
| --mini MINI | Speedtest Mini服务器的URL |
| --source SOURCE | 要绑定到的源IP地址 |
| --timeout TIMEOUT | HTTP 超时(以秒为单位)默认 10 |
| --secure | 与speedtest.net服务器进行通信时使用HTTPS而不是HTTP |
| --no-pre-allocate | 不要预先分配上传数据;默认预分配以提高上载性能,内存不足的系统使用可避免内存错误 |
| --version | 显示版本号并退出 |
Speedtest-X
- GitHub项目:https://github.com/BadApple9/speedtest-x
- Docker镜像:https://hub.docker.com/r/badapple9/speedtest-x
# 安装 Docker
curl -fsSL https://get.docker.com -o get-docker.sh && sudo sh get-docker.sh
# 或者
curl -fsSL https://get.docker.com | bash -s docker --mirror Aliyun

# 拉取 Docker 镜像
docker pull badapple9/speedtest-x

# 运行容器
docker run -d -p 9001:80 -it badapple9/speedtest-x- -d:以常驻进程模式启动
- 9001: 默认容器开放端口,可改为其他端口
- 启动时可指定的环境变量:
- -e WEBPORT=80: 容器内使用的端口
- -e MAX_LOG_COUNT=100: 最大可保存多少条测速记录
- -e IP_SERVICE=ip.sb: 使用的 IP 运营商解析服务(ip.sb 或 ipinfo.io)
- -e SAME_IP_MULTI_LOGS=false: 是否允许同一IP记录多条测速结果
简单测试
wget -qO- bench.sh | bash详细测试过程,展开查看
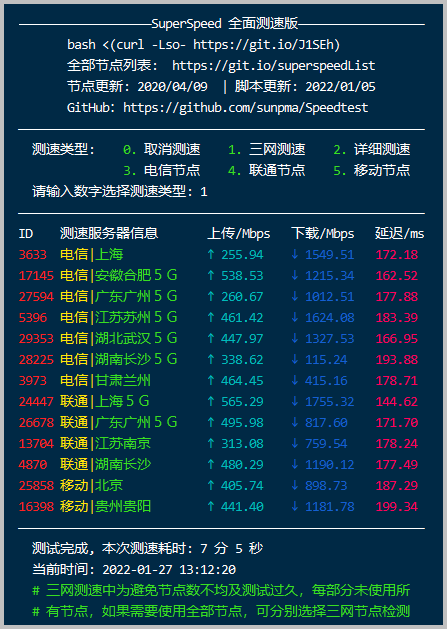
三网测速
全面的国内三大运营商(电信,联通,移动)上传下载速率测试
GitHub项目地址:https://github.com/sunpma/Speedtest
bash <(curl -Lso- https://git.io/J1SEh)
// 或者
bash <(curl -Lso- https://cdn.jsdelivr.net/gh/sunpma/Speedtest/speedtest.sh)
详细测试过程,展开查看
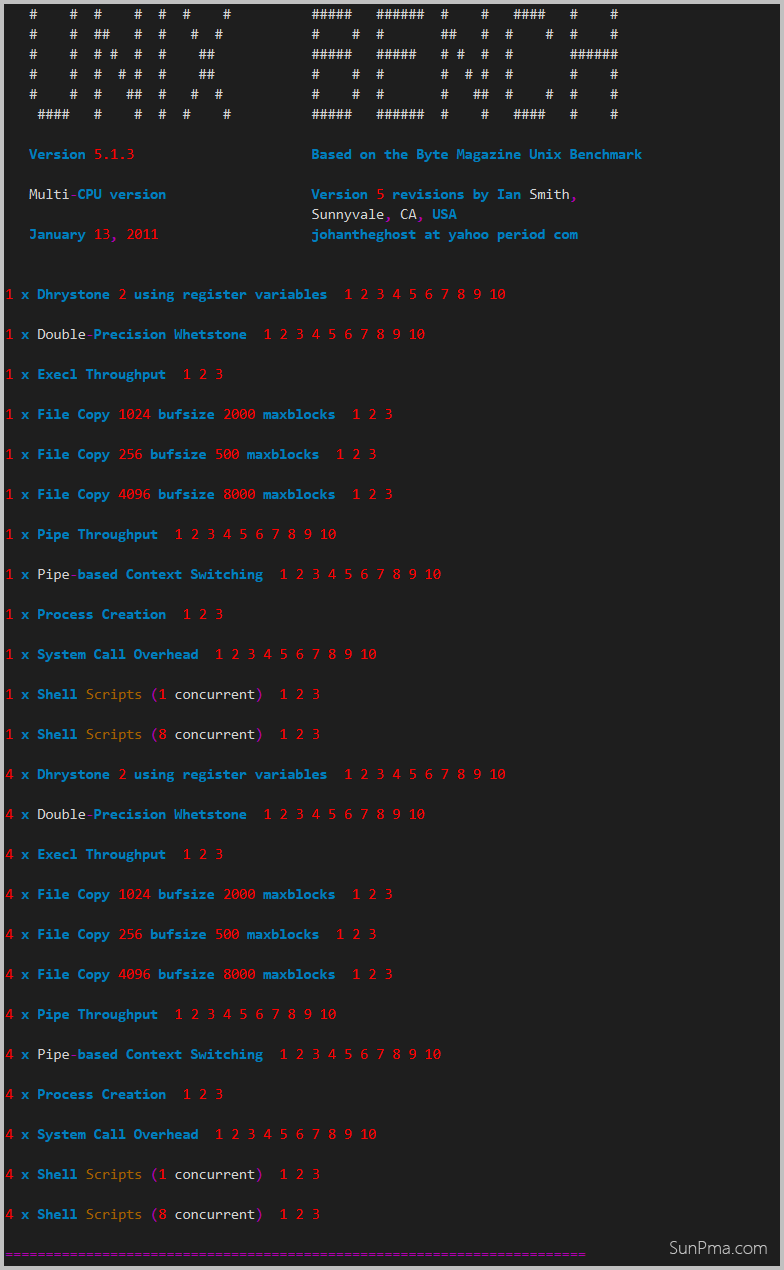
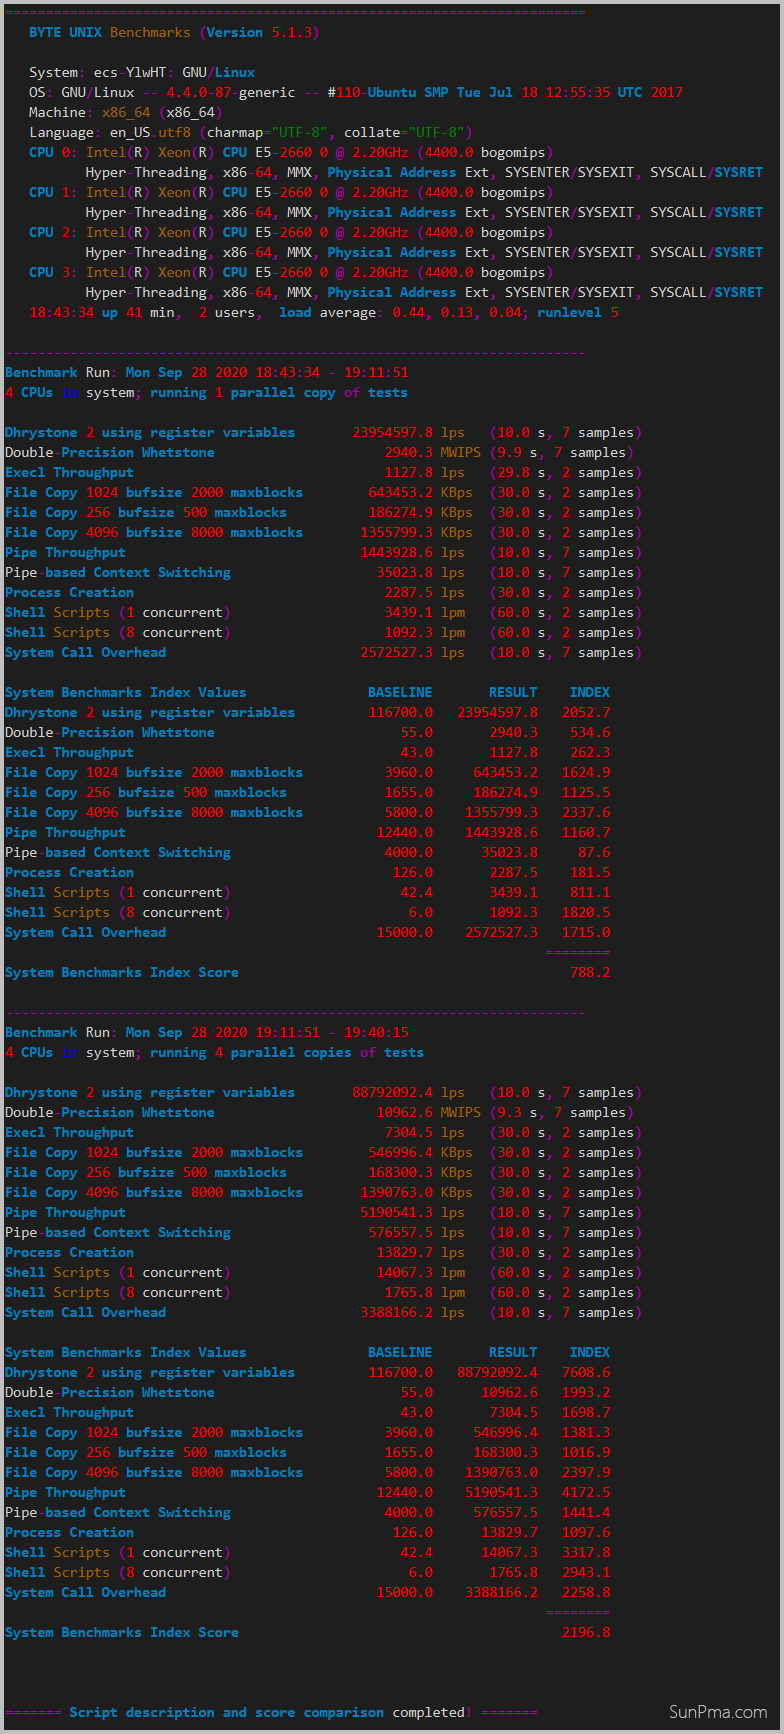
CPU测试
wget --no-check-certificate https://github.com/teddysun/across/raw/master/unixbench.sh && chmod +x unixbench.sh && ./unixbench.sh
# 或者
wget --no-check-certificate https://cdn.jsdelivr.net/gh/teddysun/across/unixbench.sh && chmod +x unixbench.sh && ./unixbench.sh
详细测试过程,展开查看
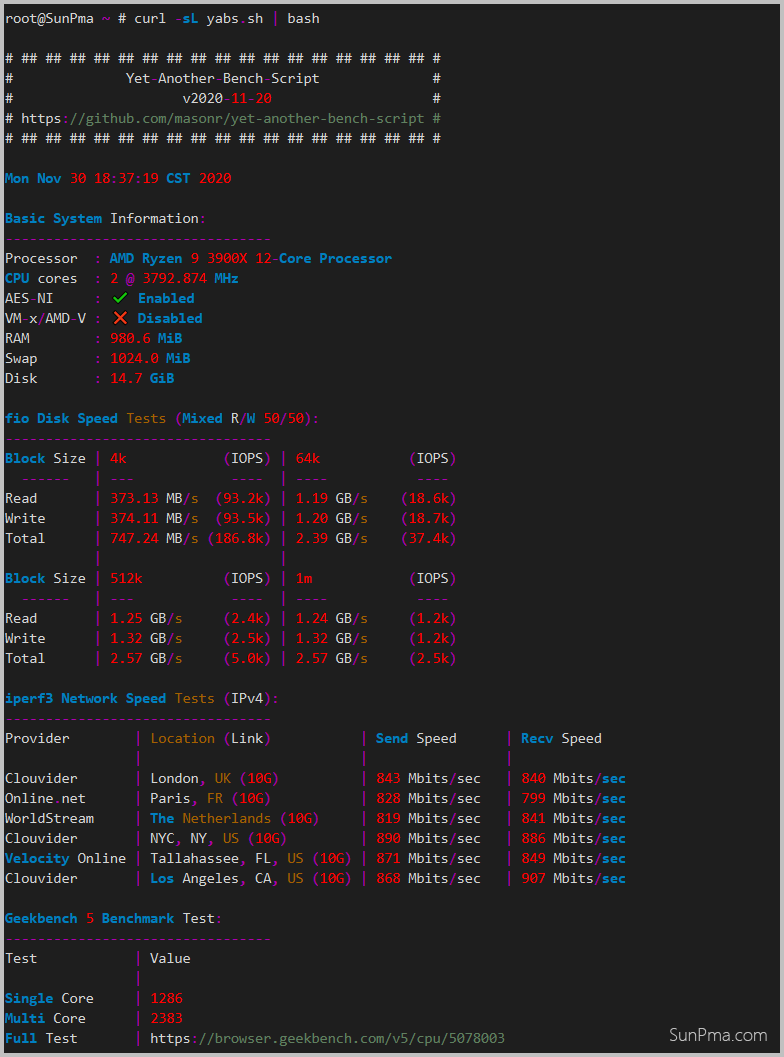
yabs.sh
GitHub:https://github.com/masonr/yet-another-bench-script
## 完整测试

curl -sL yabs.sh | bash
参数测试:
## 添加需要的参数
curl -sL yabs.sh | bash -s -- -{fdighr49}

## 例一:(仅进行Geekbench 5测试)
curl -sL yabs.sh | bash -s -- -fdi5

## 例二:(使用预编译文件 + 减少位置数量和带宽使用 + 仅运行 Geekbench 5)
curl -sL yabs.sh | bash -s -- -br5
可选参数:
| 参数 | 说明 |
|---|---|
| -b | 强制使用来自存储库的预编译二进制文件而不是本地包 |
| -d | 此选项禁用磁盘性能测试 |
| -f | 此选项禁用fio测试 |
| -i | 禁用 iperf(网络性能)测试 |
| -g | 禁用 Geekbench(系统性能)测试 |
| -n | 跳过网络信息查找并打印输出 |
| -h | 打印包含用法、检测到的标志和本地包(fio/iperf)状态的帮助消息 |
| -r | 此选项可减少iperf位置的数量(Online.net/Clouvider LON+NYC)以减少带宽使用 |
| -4 | 运行 Geekbench 4 测试并禁用 Geekbench 6 测试 |
| -5 | 运行 Geekbench 5 测试并禁用 Geekbench 6 测试 |
| -9 | 运行 Geekbench 4 和 5 测试,而不是 Geekbench 6 测试 |
| -6 | 如果使用以下任一选项,则重新启用 Geekbench 6 测试:-4、-5 或 -9(-6 标志必须放在最后才不会被覆盖) |
| -j | 将结果的 JSON 表示形式打印到屏幕上 |
| -w | 使用提供的文件名将 JSON 结果写入文件 |
详细测试过程,展开查看
Geekbench 5
AMD or Intel
wget --no-check-certificate https://cdn.geekbench.com/Geekbench-5.5.1-Linux.tar.gz

tar xf Geekbench-5.5.1-Linux.tar.gz

cd Geekbench-5.5.1-Linux

./geekbench_x86_64
ARM
wget --no-check-certificate https://cdn.geekbench.com/Geekbench-5.5.1-LinuxARMPreview.tar.gz

tar xf Geekbench-5.5.1-LinuxARMPreview.tar.gz

cd Geekbench-5.5.1-LinuxARMPreview

./geekbench_aarch64官网地址:https://www.geekbench.com/legacy
Geekbench 6
AMD or Intel
wget --no-check-certificate https://cdn.geekbench.com/Geekbench-6.3.0-Linux.tar.gz

tar xf Geekbench-6.3.0-Linux.tar.gz

cd Geekbench-6.3.0-Linux

./geekbench_x86_64
ARM
wget --no-check-certificate https://cdn.geekbench.com/Geekbench-6.3.0-LinuxARMPreview.tar.gz

tar xf Geekbench-6.3.0-LinuxARMPreview.tar.gz

cd Geekbench-6.3.0-LinuxARMPreview

./geekbench_aarch64
详细测试过程,展开查看
root@SunPma ~/Geekbench-5.5.1-Linux # ./geekbench_x86_64
Geekbench 5.5.1 Tryout : https://www.geekbench.com/

Geekbench 5 requires an active Internet connection when in tryout mode and
automatically uploads benchmark results to the Geekbench Browser.

Buy a Geekbench 5 license from the Primate Labs Store to enable offline use
and unlock other features:

  https://store.primatelabs.com/v5

Enter your Geekbench 5 license using the following command line:

  ./geekbench_x86_64 --unlock <email> <key>

  Running Gathering system information
System Information
  Operating System              Ubuntu 22.04.5 LTS
  Kernel                        Linux 6.8.0-60-generic x86_64
  Model                         OpenStack Foundation OpenStack Nova
  Motherboard                   N/A
  BIOS                          SeaBIOS rel-1.10.2-0-g5f4c7b1-20181220_000000-szxrtosci10000

Processor Information
  Name                          Intel(R) Xeon(R) CPU E5-2658 v4 @ 2.30GHz
  Topology                      1 Processor, 1 Core
  Identifier                    GenuineIntel Family 6 Model 79 Stepping 1
  Base Frequency                2.29 GHz
  L1 Instruction Cache          32.0 KB
  L1 Data Cache                 32.0 KB
  L2 Cache                      256 KB
  L3 Cache                      35.0 MB

Memory Information
  Size                          962 MB


Single-Core
  Running AES-XTS
  Running Text Compression
  Running Image Compression
  Running Navigation
  Running HTML5
  Running SQLite
  Running PDF Rendering
  Running Text Rendering
  Running Clang
  Running Camera
  Running N-Body Physics
  Running Rigid Body Physics
  Running Gaussian Blur
  Running Face Detection
  Running Horizon Detection
  Running Image Inpainting
  Running HDR
  Running Ray Tracing
  Running Structure from Motion
  Running Speech Recognition
  Running Machine Learning

Multi-Core
  Running AES-XTS
  Running Text Compression
  Running Image Compression
  Running Navigation
  Running HTML5
  Running SQLite
  Running PDF Rendering
  Running Text Rendering
  Running Clang
  Running Camera
  Running N-Body Physics
  Running Rigid Body Physics
  Running Gaussian Blur
  Running Face Detection
  Running Horizon Detection
  Running Image Inpainting
  Running HDR
  Running Ray Tracing
  Running Structure from Motion
  Running Speech Recognition
  Running Machine Learning


Uploading results to the Geekbench Browser. This could take a minute or two
depending on the speed of your internet connection.

Upload succeeded. Visit the following link and view your results online:

  https://browser.geekbench.com/v5/cpu/23613212

Visit the following link and add this result to your profile:

  https://browser.geekbench.com/v5/cpu/23613212/claim?key=446787
测试完成后会输出链接,复制链接在浏览器中打开即可查看测试分数;
官网地址:https://www.geekbench.com/preview/
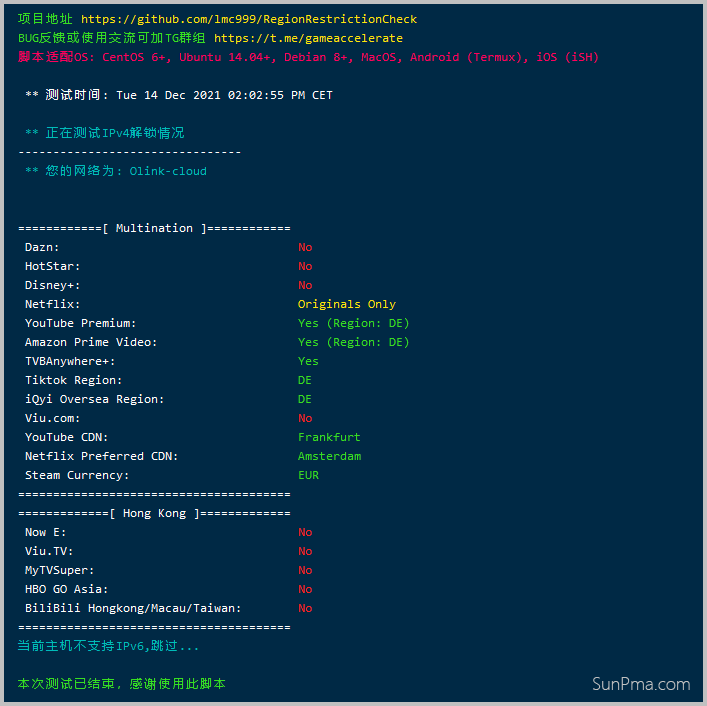
流媒体解锁
一:全流媒体解锁测试
bash <(curl -L -s https://raw.githubusercontent.com/lmc999/RegionRestrictionCheck/main/check.sh)
详细测试过程,展开查看
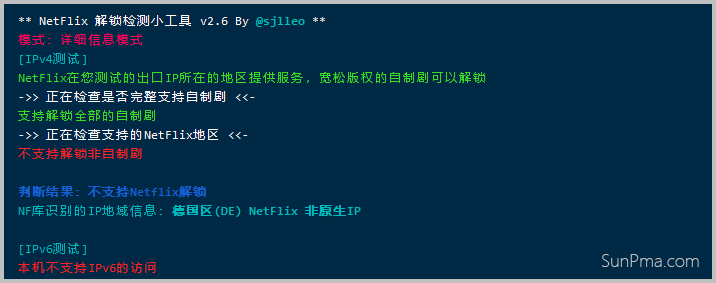
二:NETFLIX(NF解锁测试)
## X86_64
wget -O nf https://github.com/sjlleo/netflix-verify/releases/download/2.6/nf_2.6_linux_amd64 && chmod +x nf && clear && ./nf -method full

## ARM
wget -O nf https://github.com/sjlleo/netflix-verify/releases/download/2.61/nf_2.61_linux_arm64 && chmod +x nf && clear && ./nf
详细测试过程,展开查看
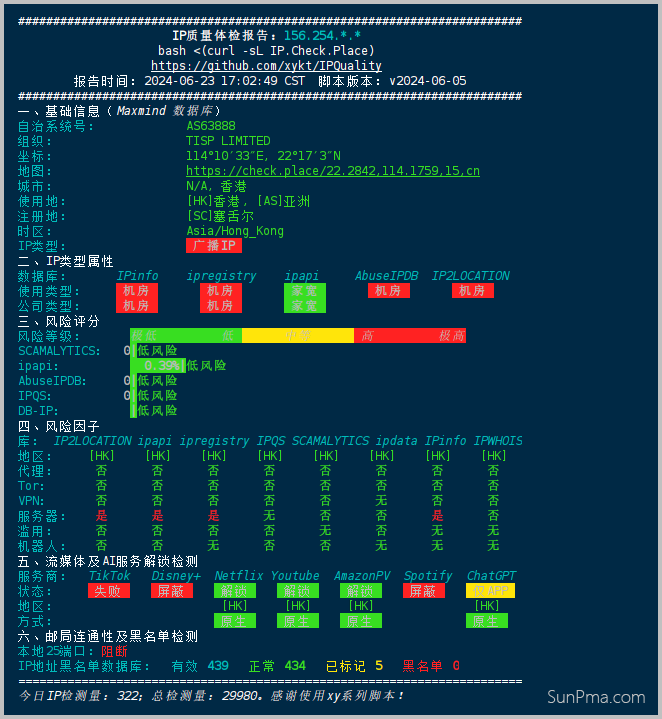
IP质量检测
bash <(curl -sL IP.Check.Place)详细测试过程,展开查看
融合怪测试
- GitHub项目Shell 版本:https://github.com/spiritLHLS/ecs
- GitHub项目Go 版本:https://github.com/oneclickvirt/ecs
Shell 版本:
curl -L https://gitlab.com/spiritysdx/za/-/raw/main/ecs.sh -o ecs.sh && chmod +x ecs.sh && bash ecs.shGo 版本
export noninteractive=true && curl -L https://raw.githubusercontent.com/oneclickvirt/ecs/master/goecs.sh -o goecs.sh && chmod +x goecs.sh && bash goecs.sh env && bash goecs.sh install && goecs详细测试过程,展开查看


网络质量体检报告
bash <(curl -sL Check.Place) -N软件卸载,因为nexttrace是绿色版单文件,卸载只需输入命令
rm /usr/local/bin/nexttrace详细测试过程,展开查看


硬盘检测
wget -q https://github.com/Aniverse/A/raw/i/a && bash a详细测试过程,展开查看

SSD检测
wget -c https://www.hdsentinel.com/hdslin/hdsentinel-019c-x64.gz

gunzip  hdsentinel-019c-x64.gz

chmod 755  hdsentinel-019c-x64

./hdsentinel-019c-x64
详细测试过程,展开查看
Hard Disk Sentinel for LINUX console 0.19c.9986 (c) 2021 info@hdsentinel.com
Start with -r [reportfile] to save data to report, -h for help

Examining hard disk configuration ...

HDD Device  0: /dev/sda
HDD Model ID : INTEL SSDSC2BB800G6
HDD Serial No: BTWA614605V4800HGN
HDD Revision : G2010150
HDD Size     : 763098 MB
Interface    : S-ATA Gen3, 6 Gbps
Temperature  : 28 °C
Highest Temp.: 30 °C
Health       : 78 %
Performance  : 100 %
Power on time: 1012 days, 12 hours
Est. lifetime: 494 days
Total written: 343.61 TB
  The status of the solid state disk is PERFECT. Problematic or weak sectors were not found.
  The health is determined by SSD specific S.M.A.R.T. attribute(s):  #233 Media Wearout Indicator
  It is recommended to continuously monitor the hard disk status.
NodeQuality
bash <(curl -sL https://run.NodeQuality.com)GitHub:https://github.com/LloydAsp/NodeQuality
测试预览:https://nodequality.com/r/tt3aTumDNdtlBAB7j2lXrD2a0R6S8XfX
版权声明:本文为原创文章,版权归 suntl.com 所有,转载请注明出处!
本文链接:https://suntl.com/42.html
友情提示:如果博客出现404或链接失效,请留言或者联系博主修复!
有什么好的服务器测试脚本
收了,感谢